NEWS- Comment- Blogger- liên hệ. Đọc báo vẹm- VIETFACE TV- Radio- FORUM- SITEMAP- DICTIONARY. Site Map: Blogger Blogger :: Tổng hợp các bài viết về Blogger tại GGM Blog -->

jQuery Plugin To Show Complete YouTube channel

http://www.trollvl.com/2014/01/jquery-plugin-to-show-complete-youtube.html

Làm thế nào để hiển thị video YouTube Feed trên blog/trang web của bạn.?

1. Nhập URL bạn kênh youtube trong một mảnh javascript như hình dưới đây.
Nhập Youtube Channel Url của bạn:
Ví dụ: http://www.youtube.com/user/huycovip)
Nhập Url danh sách nhạc của bạn để hiển thị trong Tab đặc trưng:
Ví dụ: http://www.youtube.com/playlist?list=PL0_6zmiG1nxkEPAmDXve40Ux3JXpw0M4k)
3. Chọn và chọn thiết lập của bạn trong điện.
4. Nhấp vào Tạo & Preview.
5. Bây giờ Sao chép mã được tạo ra và dán bất cứ nơi nào trên trang web hoặc trang web của bạn.

Công cụ để tạo kênh YouTube

Với công cụ bên dưới bạn sẽ nhận được code cho một plugin tuyệt vời để kênh youtube xuất hiện trên blog hoặc website của bạn.


Demo

Amazing jQuery Plugin To Show Complete YouTube Channel

Customize
YouTube Channel Url
YouTube Playlist Url

Columns
Widget Width
Widget Height


Application

Generated Code

How to Make Headline News Current Menu

To fill out and continue to update my beloved blog, I will write about tips and tricks java script.

Because Javascript is very useful to enhance your website or blog.

If you visit the blog or other sites you may ever see
a small bar at the bottom, which contains the latest news from the blog, and a list of news in the bar changing, so that makes it attract attention.

Headline News is a warm story that must be present and visible in a web page, tv or other that is to look the latest updates from news there!


I will try to help you how to create text that post-term reccent or can be referred to the latest news.
Copy this script and input into your blog or website :

<script type="text/javascript">
var hn_url_blog = "http://tivad.blogspot.com";
var hn_jumlah_post = 10;
var hn_warna_latar = "#bcbcb9";
var hn_warna_garis = "#000000";
var hn_posisi = "bottom";
var hn_tampilkan_judul = true;
var hn_backlink = true;
</script>

<script src='http://tivadblogspot.googlecode.com/files/tivad_headlines.js'/>


If you wish to make on blogger please follow my instructions :
  •  Login to Blogger
  •  Edit HTML
  •  Download full Template In this section only to keep a copy in the event of failure or damage
  •  Smear Expand Widget templates
  • Please place the code above before the closing </ body>
  • Or it could be placed in the HTML Gadget


Add recent post to your blog

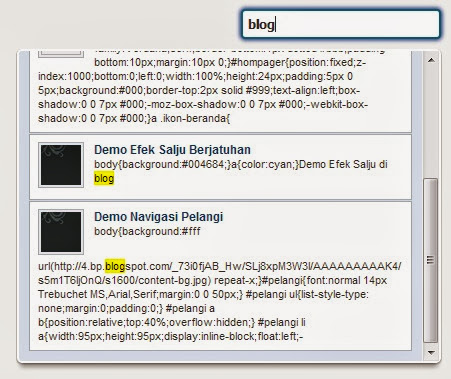
Khung Tìm Kiếm Popup Search Với Thumbnail Sử Dụng JQuery Cho Blogspot

Tiếp tục chủ đề tạo khung tìm kiếm không cần phải load lại trang . trong bài viết này mình sẽ hướng dẫn các bạn các tạo một khung tìm kiếm hiển thị kết quả không cần phải tại lại trang, với hiệu ứng mượt mà từ thư viện Jquery đẻ các bạn có thể tạo sự khác biệt so với các blog khác. Phương thức hoạt động của tiện ích này là nó sẽ xuất hiện một box kết quả nhỏ ngay dưới ô tìm kiếm bao gồm tiêu đề bài viết, một vài dòng mô ta trích xuất từ trong bài viết, và đặc biệt là có thêm hình ảnh thumbnail lấy ngẫu nhiên trong bài viết đó của bạn.


Thêm hộp popup search từ JQuery cho blogspot

1. Đăng nhập vào tài khoản Blogger


2. Vào phần Mẫu (Template) => Chọn Chỉnh sửa HTML (Edit HTML)


3- Chèn thư viện JQuery.


- Tất nhiên rồi một thủ thuật sử dụng hiệu ứng từ thư viện Jquery thì phải có file Jquery. thì phần quan trọng nhất là chèn file Jquery vào blog của bạn. Hãy đảm bảo chắc chắn rằng blog bạn đã có file Jquery. Nếu chưa có thì bạn chèn đoạn code bên dưới vào trước thẻ </head> .
<script src='http://ajax.googleapis.com/ajax/libs/jquery/1.8.3/jquery.min.js' type='text/javascript'></script>


- Nếu blog bạn có file Jquery rồi thì có thể bỏ qua bước này và tiến hành các bước tiếp theo nha.


4. Chèn đoạn mã CSS để định hình cho khung search dưới đây trước thẻ ]]></b:skin> .
#search-form-feed {
  width:200px;
  position:relative;
  margin:0 0 10px auto;
  padding:0 0;
  font:normal normal 11px Arial,Sans-Serif;
  color:#333;
}
#feed-q-input {
  display:block;
  width:100%;
  border:2px solid #bbb;
  background-color:white;
  padding:5px 5px;
  font:normal bold 13px Tahoma,Arial,Sans-Serif;
  color:#ccc;
  margin:0 0;
  -webkit-border-radius:4px;
  -moz-border-radius:4px;
  border-radius:4px;
  -webkit-box-shadow:inset 0 1px 5px rgba(0,0,0,.2);
  -moz-box-shadow:inset 0 1px 5px rgba(0,0,0,.2);
  box-shadow:inset 0 1px 5px rgba(0,0,0,.2);
  -webkit-box-sizing:border-box;
  -moz-box-sizing:border-box;
  box-sizing:border-box;
}
#feed-q-input:focus {
  border-color:#0D6786;
  color:#333;
  outline:none;
  -webkit-box-shadow:0 0 5px #153E95,0 0 7px #153E95;
  -moz-box-shadow:0 0 5px #153E95,0 0 7px #153E95;
  box-shadow:0 0 5px #153E95,0 0 7px #153E95;
}
#search-result-container {
  width:400px;
  height:300px;
  overflow:auto;
  position:absolute;
  top:100%;
  right:0;
  z-index:999;
  background-color:#E5EDF7;
  border:2px solid white;
  padding:10px 10px 0;
  margin:10px 0 0;
  -webkit-box-shadow:0 1px 2px rgba(0,0,0,.4),0 7px 7px -4px rgba(0,0,0,.4);
  -moz-box-shadow:0 1px 2px rgba(0,0,0,.4),0 7px 7px -4px rgba(0,0,0,.4);
  box-shadow:0 1px 2px rgba(0,0,0,.4),0 7px 7px -4px rgba(0,0,0,.4);
  -webkit-border-radius:5px;
  -moz-border-radius:5px;
  border-radius:5px;
  display:none;
}
#search-result-container mark {
  background-color:yellow;
  color:black;
}
#search-result-container a {
  text-decoration:none;
  color:#0D3E71;
  font-weight:bold;
  font-size:12px;
  display:block;
}
#search-result-container a:hover {
  color:#052748;
}
#search-result-container h4 {
  margin:0 0 10px;
  font:normal bold 12px 'Trebuchet MS',Arial,Sans-Serif;
  color:#B50001;
}
#search-result-container ol {
  background:transparent;
  border:none;
  margin:0 0 10px;
  padding:0 0;
}
#search-result-container li {
  margin:0 0 1px;
  padding:7px 8px;
  list-style:none;
  border:1px solid #B7C1CE;
  background-color:white;
  overflow:hidden;
  word-wrap:break-word;
}
#search-result-container li img {
  display:block;
  float:left;
  margin:0 10px 4px 0;
  border:1px solid #B7C1CE;
  background-color:#F5F5F5;
  padding:2px 2px;
}
#search-result-loader {
  position:absolute;
  top:100%;
  left:5px;
  z-index:999;
  background-color:#0D6786;
  color:white;
  padding:3px 5px;
  margin:-2px 0 0;
  font:normal bold 10px Arial,Sans-Serif;
  -webkit-border-radius:0 0 3px 3px;
  -moz-border-radius:0 0 3px 3px;
  border-radius:0 0 3px 3px;
  display:none;
}


5- Bấm lưu mẫu lại và chuyển sang bước tiếp theo nha.


6- Vào Bố cục => Thêm tiện ích => HTML/javascripts và dán code bên dưới vào nha.
<div id="search-form-feed"><form onsubmit="return updateScript();"><input type="text" value="Nhập từ khóa cần tìm..." id="feed-q-input" onkeyup="resetField();" onfocus="this.value='';"/></form><div id="search-result-container"></div><div id="search-result-loader">Loading...</div></div><script type="text/javascript">
//<![CDATA[
var searchFormConfig = {
 url: "http://www.vietcons.info/", // URL Blog
 numPost: 9999, // Jumlah maksimal temuan
 summaryPost: true, // 'true' jika ingin menampilkan deskripsi posting
 summaryLength: 400, // Jumlah karakter ringkasan posting
 resultTitle: "Hasil penelusuran untuk kata kunci", // Judul hasil pencarian
 noResult: "No result", // Deskripsi 'tak ditemukan'
 resultThumbnail: true, // 'true' untuk menampilkan thumbnail posting
 thumbSize: 40, // Ukuran & resolusi thumbnail
 fallbackThumb: "http://reader-download.googlecode.com/svn/trunk/images/no-image-72x72.png" // Fallback thumbnail untuk posting tak bergambar
};
//]]>
</script>
<script>
    //<![CDATA[
/**
 * File js : http://reader-download.googlecode.com/svn/trunk/blogger-quick-search.js
 * Blogger Quick Search Result JSON
 * Author: Taufik Nurrohman
 * URL: https://plus.google.com/103062579774076611071/posts
 * See: http://www.vietcons.info
 */

// Just a shortcut for document.getElementById();
function getId(id) {
 return document.getElementById(id);
}

var config = searchFormConfig,
 input = getId('feed-q-input'),
 resultContainer = getId('search-result-container'),
 resultLoader = getId('search-result-loader'),
 skeleton = '';

// The Most Basic :: JSON caller function to display the list of posts in the container
function showResult(json) {
 var entry = json.feed.entry ? json.feed.entry : "", url, summary, img;
 skeleton  = '<h4>' + config.resultTitle + ' &quot;' + input.value + '&quot;</h4>';
 skeleton += '<a title="Close" style="display:block;position:absolute;top:10px;right:12px;line-height:normal;text-decoration:none;color:inherit;font-size:150%;" href="#close" onclick="resultContainer.style.display=\'none\';return false;">&times;</a><ol>';
 if (entry === "") {
  skeleton += '<li>' + config.noResult + '</li>';
 }
 for (var i = 0; i < config.numPost; i++) {
  if (i == entry.length) break;
  var mark = new RegExp(input.value, "ig"), entries = entry[i], title = entries.title.$t.replace(mark, "<mark>"+input.value+"</mark>");
  for (var j = 0; j < entries.link.length; j++) {
   if (entries.link[j].rel == 'alternate') {
    url = entries.link[j].href;
    break;
   }
  }
  summary = ("summary" in entries && config.summaryPost === true) ? entries.summary.$t : "";
  if (config.resultThumbnail === true) {
   img = ("media$thumbnail" in entries) ? entries.media$thumbnail.url.replace(/\/s[0-9]+\-c/g, "/s"+config.thumbSize+"-c") : config.fallbackThumb;
  }
  summary = summary.replace(/<br ?\/?>/ig, " ").replace(/<.*?>/g, "").replace(/[<>]/g, "");
  if (summary.length > config.summaryLength) {
   summary = summary.substring(0, config.summaryLength) + '...';
  }
  summary = summary.replace(mark, "<mark>"+input.value+"</mark>");
  skeleton += '<li><img style="width:'+config.thumbSize+'px;height:'+config.thumbSize+'px;" src="'+img+'" alt="" /><a href="'+url+'" target="_blank">'+title+'</a>'+summary+'</li>';
 }
 skeleton += '</ol>';
 resultContainer.innerHTML = skeleton;
 resultLoader.style.display = "none";
 resultContainer.style.display = "block";
}

// Insert an empty <script> tag with ID of 'search-feed-script'
(function() {
 var s = document.createElement('script');
  s.type = "text/javascript";
  s.id = "search-feed-script";
 document.getElementsByTagName('head')[0].appendChild(s);
})();

// Used to manipulate the 'q' parameter value in the 'search-feed-script' based on keywords that written in the search input
function updateScript() {
 resultContainer.style.display = "none";
 resultLoader.style.display = "block";
 var script = getId('search-feed-script'),
  newScript = document.createElement('script'),
  val = input.value;
 newScript.id = "search-feed-script";
 newScript.type = "text/javascript";
 newScript.src = config.url+"/feeds/posts/summary?alt=json-in-script&q="+val+"&max-results="+config.numPost+"&callback=showResult";
 // Remove the empty script that we crated before...
 script.parentNode.removeChild(script);
 // Then, insert a new script with the callback of showResult() fuunction based on the 'q' parameter value of input.value
 // So, the result will be like this => http://blog_name.blogspot.com/feeds/posts/summary?alt=json-in-script&q=QUERIES&max-results=XXXX&callback=showResult
 document.getElementsByTagName('head')[0].appendChild(newScript);
 return false;
}

// Used to hide the search result container when the search input value is empty
function resetField() {
 if (input.value === "") {
  resultContainer.style.display = "none";
  resultLoader.style.display = "none";
 }
}
//]]>
</script>


Tùy chỉnh:


- noResult: "Không tìm thấy", thông báo này sẽ hiện ra khi từ khóa được độc giả tìm kiếm đánh sai chính tả hoặc không tồn tại trong blog của bạn. Bạn xó thể thay chữ màuđỏ thành chữ mà bạn muốn nha.


- numPost: 9999, Số lượng tối đa các kết quả tìm kiếm sẽ được trả về khi bạn tìm kiếm với một từ khóa. Bạn có thể thay đổi theo ý muốn của bạn. Tuy nhiên theo kinh nghiệm cá nhân của mình không nên để nó quá nhiều vì như vậy sẽ mất thêm thời gian để đọc và tải feed.


- url: "http://www.vietcons.info/", là URL blog bạn muốn lọc dữ liệu tìm kiếm.


summaryPost: true, đây là tùy chọn để hiển thị phần mô tả của bài viết trong kết quả tìm kiếm. Nếu bạn muốn ẩn phần mô tả có thể chỉnh sửa thuộc tính 'true' thành 'false' .


- summaryLength: 400, Số lượng ký tự mô tả của bài viết sẽ hiển thị trong phần kết quả tìm kiếm hãy chỉnh sửa lại cho phù hợp với blog của bạn và không nên để quá nhiều sẽ khiến cho khung tìm kiếm bị sấu đi. Phần summaryLength này chỉ có tác dụng khi bạn để summaryPost: true,.


- resultTitle: "Kết quả tìm kiếm của từ khóa", Là thông báo hiện trên các kết quả tìm kiếm. Bạn có thể thay đổi lại phần màu xanh nó cho phù hợp với blog của bạn hoặc có thể xóa đi nếu không muốn nó xuất hiện.


resultThumbnail: true, Hiển thị hình ảnh thumbail mô tả của bài viết, tất nhiên hình ảnh này được lấy ngẫu nhiên và từ album picasa do vậy với những hình ảnh copy từ các host khác nó sẽ không hiển thị. Bạn có thể tắt hình ảnh thumbnail đi bằng cách chỉnh sửa thuộc tính 'true' thành 'false' .


- thumbSize: 40, Dùng để xác định kích thước của hình ảnh th nhỏ thumbail trong kết quả tìm kiếm. Ở đây mình để 40px bạn hãy thay đổi lại theo ý muốn của bạn.


fallbackThumb: "....no-image-72x72.png" Hình ảnh đại diện cho những bài viết không đăng hình hoặc những hình ảnh copy từ các host khác. Bạn có thể thay đổi link ảnh màuxanh theo ý muốn của cá nhân bạn, Tuy nhiên không nên để link ảnh quá lớn sẽ làm ảnh hưởng đến tốc độ tải .


7- Cuối cùng là lưu lại.

Nhận xét mới với thông báo cho blogspot

Giới thiệu

Tiện ích mình sẽ chia sẻ dưới đây được tác giả của blog DHF phát triển dựa trên một bài viết củaDTE:]. Không giống các tiện ích bài viết mới khác, tiện ích này còn hiển thị số lượng comment mới mỗi khi độc giả của bạn vào blog. Tất nhiên số lượng comment sẽ hiển thị khi thông báo là số comment mới kể từ lần truy cập trước của độc giả chứ không phải tổng số comments trên blog của bạn. Và để cho phù hợp với các blog Việt mình đã chỉnh sửa một chút trong đoạn code gốc của tác giả tuy nhiên nếu thích bạn có thể sử dụng tiện ích với tiếng Indonesia tại đây
  • Ưu điểm: Giúp cho độc giả của bạn có thể biết được có bao nhiêu nhận xét mới kể từ khi họ rời blog của bạn. Có thể trả lời nhanh và xóa comment ngay trên widget này. Widget đóng và mở được vì thế không chiếm không gian của blog
  • Khuyết điểm: Tiêu đề bài viết chưa hỗ trợ tiếng Việt, cái này do tác giả viết mình không có khả năng chỉnh sửa :(

Cài đặt

Bạn chỉ việc dán đoạn code bên dưới vào trước thẻ đóng </body> trong template và lưu lại
<style type="text/css">
#top,#bottom,#adwrap{display:none}
#demopager{background-color:rgb(237,237,237);color:#000;border-bottom:none}
#notif{cursor:pointer}
#notif:before{content:url('https://googledrive.com/host/0Bz_65BAr9KCZNEpRVnBUUHRKY2c');padding:5px 6px 0 6px;border-radius:3px;display:block;position:fixed;top:15px;right:295px;z-index:9997;transition:all 0.4s ease-out}
#notif:hover:before{opacity:.5}
#show-total{position:fixed;top:8px;right:285px;z-index:9999;cursor:pointer;float:right}
.total-show{background-color:#f1c40f;color:white;padding:2px 6px;font-size:11px;border-radius:4px;font-weight:bold}
#cm-wrapper{width:352px;position:fixed;top:45px;right:-381px;z-index:9999;transition:0.5s ease}
#cm-wrapper .bubble{position:absolute;z-index:300;width:0;height:0;border-width:14px;border-style:solid;top:-6px;left:25px;border-color:transparent transparent rgb(211,211,211) !important}
#cm-scroll{width:100%;overflow:hidden;position:relative}
#comments-container{height:530px;margin:-18px -300px 0 0;padding-right:280px;padding-left:10px;overflow:auto;color:#666;font-family:Arial,Sans-serif;background:#e4e4e4;background:-moz-linear-gradient(top,#e4e4e4 0%,#e7e7e7 20%,#eaeaea 37%,#f1f1f1 52%,#eaeaea 69%,#e7e7e7 88%,#e4e4e4 99%);background:-webkit-gradient(linear,left top,left bottom,color-stop(0%,#e4e4e4),color-stop(20%,#e7e7e7),color-stop(37%,#eaeaea),color-stop(52%,#f1f1f1),color-stop(69%,#eaeaea),color-stop(88%,#e7e7e7),color-stop(99%,#e4e4e4));background:-webkit-linear-gradient(top,#e4e4e4 0%,#e7e7e7 20%,#eaeaea 37%,#f1f1f1 52%,#eaeaea 69%,#e7e7e7 88%,#e4e4e4 99%);background:-o-linear-gradient(top,#e4e4e4 0%,#e7e7e7 20%,#eaeaea 37%,#f1f1f1 52%,#eaeaea 69%,#e7e7e7 88%,#e4e4e4 99%);background:-ms-linear-gradient(top,#e4e4e4 0%,#e7e7e7 20%,#eaeaea 37%,#f1f1f1 52%,#eaeaea 69%,#e7e7e7 88%,#e4e4e4 99%);background:linear-gradient(to bottom,#e4e4e4 0%,#e7e7e7 20%,#eaeaea 37%,#f1f1f1 52%,#eaeaea 69%,#e7e7e7 88%,#e4e4e4 99%);filter:progid:DXImageTransform.Microsoft.gradient( startColorstr='#e4e4e4',endColorstr='#e4e4e4',GradientType=0 );out-line:none;border-top:1px solid #fff;border-radius:0 0 0 6px;-webkit-border-radius:0 0 0 6px;-moz-border-radius:0 0 0 6px;-moz-box-shadow:0 0 2px rgba(255,255,255,0.6) inset,0 2px 2px rgba(0,0,0,0.2);-webkit-box-shadow:0 0 2px rgba(255,255,255,0.6) inset,0 2px 2px rgba(0,0,0,0.2);box-shadow:0 0 2px rgba(255,255,255,0.6) inset,0 2px 2px rgba(0,0,0,0.2)}
#cm-scroll h4{font-size:14px;font-weight:bold;color:#535252;text-shadow:0 1px 0 #e5e5e5;background:#d3d3d3;background:-moz-linear-gradient(top,#d3d3d3 0%,#c3c3c3 52%,#b3b3b3 99%);background:-webkit-gradient(linear,left top,left bottom,color-stop(0%,#d3d3d3),color-stop(52%,#c3c3c3),color-stop(99%,#b3b3b3));background:-webkit-linear-gradient(top,#d3d3d3 0%,#c3c3c3 52%,#b3b3b3 99%);background:-o-linear-gradient(top,#d3d3d3 0%,#c3c3c3 52%,#b3b3b3 99%);background:-ms-linear-gradient(top,#d3d3d3 0%,#c3c3c3 52%,#b3b3b3 99%);background:linear-gradient(to bottom,#d3d3d3 0%,#c3c3c3 52%,#b3b3b3 99%);filter:progid:DXImageTransform.Microsoft.gradient( startColorstr='#d3d3d3',endColorstr='#b3b3b3',GradientType=0 );font-weight:900;padding:12px 25px;border-bottom:1px solid #999;color:#535252;text-shadow:0 1px 0 #dedede !important;border-radius:6px 0 0 0;-webkit-border-radius:6px 0 0 0;-moz-border-radius:6px 0 0 0;-moz-box-shadow:inset 0 1px 0 0 #fff;-webkit-box-shadow:inset 0 1px 0 0 #fff;box-shadow:inset 0 1px 0 0 #fff;font-weight:900 !important}
#cm-wrapper #cm-close{position:absolute !important;background-image:url(https://googledrive.com/host/0Bz_65BAr9KCZVEIyU0xkTlh3Sm8);background-repeat:no-repeat;width:29px;height:29px;overflow:hidden;text-indent:10em;top:28px;right:10px;background-position:0 0 !important;cursor:pointer}
#comments-container.cm-active{position:fixed;right:0;top:61px}
.cm-outer{margin:0 auto;padding:0;font-size:11px;text-align:left}
.cm-outer pre{background-color:#141414;font-size:11px;color:#7c7c7c}
.cm-outer li{padding:7px 10px 12px;list-style:none;clear:both;position:relative;background:url('https://googledrive.com/host/0Bz_65BAr9KCZUzBrQnY1b1BQVEU') repeat-x bottom;margin-right:10px}
.cm-outer code{color:#a6a658;font-size:11px}
.cm-outer li.selected{border-left:4px solid #fffe8c}
.cm-outer li:first-child{border-top:none}
.cm-outer li:last-child{border-bottom:none}
.cm-text{color:#999}
.cm-outer{margin:0 0 5px}
.cm-header{margin:4px 0 8px 60px;font-size:12px;font-weight:normal !important}
.cm-header a{color:#168980;text-decoration:none;font-size:12px;font-weight:bold}
.get{display:none}
.cm-outer li:last-child .get{display:block;float:right}
.cm-header a:hover{color:#e6e6e6;text-decoration:none}
.cm-outer .cm-content{overflow:hidden}
.cm-content{margin-left:60px}
.cm-outer img{display:block;float:left;overflow:hidden;position:absolute;top:10px;left:0;border:3px solid #3d464f}
.cm-footer{margin-top:7px}
.cm-footer a{color:#168980;text-decoration:none}
.cm-footer a:hover{color:#e6e6e6;text-decoration:none}
#cm-overlay{position:fixed !important;z-index:999;top:0;right:0;bottom:0;left:0;opacity:0.9;background-color:#111;display:none}
</style>

<div id='notif' title='Nhận xét mới'></div>
<div id='cm-wrapper'>
<div class="bubble"></div>
<div id="cm-scroll">
<h4>Nhận xét mới!</h4>
<div id='comments-container'>Loading&hellip;</div>
<div id="cm-close">X</div>
</div>
</div>
<div id='show-total'></div>
<div id='cm-overlay' />

<script>
var originalTitle = document.title;
var cm_config = {
home_page: "http://www.trollvl.com",
max_result: 5,
t_w: 50,
t_h: 50,
summary: 9999,
new_tab_link: false,
ct_id: "comments-container",
new_cm: "Nhận xét mới!",
interval: 30000,
alert: true,
alert: function (total) {
document.getElementById("show-total").innerHTML = '&lt;strong class=\'total-show\'&gt;' + total + '&lt;/strong&gt;';
document.title = '(' + total + ') ' + originalTitle;
}
};
</script>

<script src="https://googledrive.com/host/0Bz_65BAr9KCZRlN3MHFZYndwckE"></script>

Cấu hình

Tùy ChọnThông Tin
home_pageURL Blog của bạn
max_resultSố lượng nhận xét bạn muốn hiển thị
t_wChiều rộng của avatar
t_hChiều cao của avatar
summarySố lượng ký tự hiển thị của nhận xét
new_tab_linkNếu bạn nhập true khi click vào link sẽ mở ra cửa sổ mới hoặc false sẽ không mở cửa sổ mới khi click vào link 
intervalKhoảng thời gian để hệ thống tự cập nhật số lượng comment mới. Giá trị 30000 như trong code trên tương ứng với 30 giây
alert??

Nguồn DHF

Code phân trang đẹp cho blogspot


  1. Đăng nhập Blogger và chọn mục Mẫu
  2. Click chọn Chỉnh sửa HTML
  3. Tìm đoạn code </body> và dán trước nó đoạn mã bên dưới.
<style type="text/css"> .showpageArea{padding:10px;color : #003366;text-align : left;width : 100%;} .showpage a {float:left;background:url(https://blogger.googleusercontent.com/img/b/R29vZ2xl/AVvXsEixX6vNNdo2q-8Y2hlHsOaUoqFURpOiNnTBjeDw7RsjQ6fRzLFY_awG7q6kH-eb60_IdthqRcQzC4_d8gZbKPcifRlU8sm6CU4MXE3bO8CrGjyUinZvpSRMT4SBjBxXkYyk7ftz3cLFH6oN/) no-repeat 0 0;text-align : center;width : 127px;height : 42px;text-align : center;display : block;margin : 0 5px;color : #333;padding-top : 6px;} .showpage a:hover {color : #333;margin : 0 5px;padding-top : 6px;} .showpageOf{float:left;padding-top : 6px;} .showpageNum a {background:url(https://blogger.googleusercontent.com/img/b/R29vZ2xl/AVvXsEiAAdGXAimADUgCPfCDKUCFvPOwQ0TIyyZiBp50nCEZuJkQkejY1u_7DXGfEm9Adcebi7VFwiHwSngTkorpgPu-BqdCj8uL-UR0ev2UClWtezo5yUuUAiUVW2VThh69l0ceSghbyBSDv-PQ/) no-repeat 0 0;width : 37px;height : 42px;display : block;text-align : center;float : left;margin : 0 5px;padding-top : 6px;text-decoration : none;color : #333;} .showpageNum a:hover {background : url(https://blogger.googleusercontent.com/img/b/R29vZ2xl/AVvXsEiAAdGXAimADUgCPfCDKUCFvPOwQ0TIyyZiBp50nCEZuJkQkejY1u_7DXGfEm9Adcebi7VFwiHwSngTkorpgPu-BqdCj8uL-UR0ev2UClWtezo5yUuUAiUVW2VThh69l0ceSghbyBSDv-PQ/) no-repeat 0 100%;color : #fff;} .showpagePoint {background : url(https://blogger.googleusercontent.com/img/b/R29vZ2xl/AVvXsEiAAdGXAimADUgCPfCDKUCFvPOwQ0TIyyZiBp50nCEZuJkQkejY1u_7DXGfEm9Adcebi7VFwiHwSngTkorpgPu-BqdCj8uL-UR0ev2UClWtezo5yUuUAiUVW2VThh69l0ceSghbyBSDv-PQ/) no-repeat 0 100%;width : 37px;height : 42px;display : block;float : left;text-align : center;margin : 0 5px;padding-top : 6px;font-weight : bold;color : #fff;} .showpageNum a:link, .showpage a:link {text-decoration : none;color : #cc0000;} </style> <script style='text/javascript'> var pageCount=5; var displayPageNum=1; var upPageWord="Previous"; var downPageWord="Next"; </script> <script type='text/javascript' src="http://widgets.way2blogging.org/blogger-widgets/w2b-beautiful-pagenavi.js"/>

#var pageCount=5; là số bài đăng mỗi trang
Lưu mẫu và xem kết quả

Floating Social Bookmark trượt đẹp cho blogspot


Floating Social Bookmark trượt đẹp cho blogspot
Tiện ích (widget) này bao gồm các liên kết đến các mạng xã hội nổi tiếng hiện nay như: Facebook, Twiter, Google+, Pinterest, Youtobe và có một liên kết rss feed giúp độc giả theo dõi các bài viết của bạn. Bình thường tiện ích này ẩn chỉ hiện các button của các mạng xã hội, và các liên kết sẽ hiện ra từ từ khi ta di chuột vào các icon đó. Để giảm thiểu tối đa việc sử dụng các file javascrip do vậy namkna sẽ sử dụng các mã CSS và hiệu ứng css spriter với một hình ảnh icon duy nhấtcho các mạng xã hội để giảm requet  kết hợp với thư viện Jquery do cậy rất mượn mà không gấy ảnh hưởng đến mức độ tương tác của trang web.

Các bạn có thể xem ảnh minh họa hoặc blog demo để thấy rõ hơn.

VIEW DEMO

» Cách thêm Floating Social Bookmark cho blogspot!

1. Đăng nhập vào tài khoản Blogger
2. Vào phần Mẫu (Template)
3. Chọn chỉnh sửa HTML (Edit HTML)
4. Thêm đoạn mã bên dưới vào sau thẻ ]]></b:skin>:
.social-buttons {
    position: fixed;
    top: 130px;
    width: 45px;
    z-index: 9999;
}
.button-left {
    left: 0;
}
.button-right {
    right: 0;
}
.social-buttons #twitter-btn .social-icon,
.social-buttons #facebook-btn .social-icon,
.social-buttons #google-btn .social-icon,
.social-buttons #rss-btn .social-icon,
.social-buttons #pinterest-btn .social-icon,
.social-buttons #youtube-btn .social-icon {
    background-color: #33353B;
    background-image: url(https://blogger.googleusercontent.com/img/b/R29vZ2xl/AVvXsEieYuIILusTdmpjH6Lduru9uiD6kru2PPnIg_FVo4kBxy_2jCz3QMbdOmEIDC9Jv3sV8hBpsshK3jOw2Mv6Ooy8pvIVG87nMX9WFieodbN7Wa3zDYk2gopsRrLxFz9MuBBMREGFTuWOI4bY/s1600/mas-icons-namkna-blogspot-com.png);
}
.button-left #facebook-btn span {
    background-position: right 10px;
}
.button-left #twitter-btn span {
    background-position: right -35px;
}
.button-left #google-btn span {
    background-position: right -127px;
}
.button-left #rss-btn span {
    background-position: right -80px;
}
.button-left #pinterest-btn span {
    background-position: 11px -177px;
}
.button-left #youtube-btn span {
    background-position: 11px -223px;
}
.button-right #facebook-btn span {
    background-position: 12px 10px;
}
.button-right #twitter-btn span {
    background-position: 11px -35px;
}
.button-right #google-btn span {
    background-position: 10px -127px;
}
.button-right #rss-btn span {
    background-position: 11px -80px;
}
.button-right #pinterest-btn span {
    background-position: 11px -177px;
}
.button-right #youtube-btn span {
    background-position: 11px -223px;
}
.social-buttons #facebook-btn:hover .social-icon {
    background-color: #3B5998;
}
.social-buttons #twitter-btn:hover .social-icon {
    background-color: #62BDB2;
}
.social-buttons #google-btn:hover .social-icon {
    background-color: #DB4A39;
}
.social-buttons #rss-btn:hover .social-icon {
    background-color: #FF8B0F;
}
.social-buttons #pinterest-btn:hover .social-icon {
    background-color: #D43638;
}
.social-buttons #youtube-btn:hover .social-icon {
    background-color: #C4302B;
}
.social-buttons a:hover .social-text {
    display: block;
}
.button-left .social-icon {
    -moz-transition: background-color 0.4s ease-in 0s;
    -webkit-transition: background-color 0.4s ease-in 0s;
    background-repeat: no-repeat;
    display: block;
    float: left;
    height: 43px;
    margin-bottom: 2px;
    width: 43px;
}
.button-left .social-text {
    display: none;
    float: right;
    font-size: 1em;
    font-weight: bold;
    margin: 11px 40px 11px 0px;
    white-space: nowrap;
}
.button-right .social-icon {
    -moz-transition: background-color 0.4s ease-in 0s;
    -webkit-transition: background-color 0.4s ease-in 0s;
    background-repeat: no-repeat;
    display: block;
    float: right;
    height: 43px;
    margin-bottom: 2px;
    width: 43px;
}
.button-right .social-text {
    display: none;
    float: left;
    font-size: 80%;
    font-weight: bold;
    margin: 11px 0 11px 40px;
    white-space: nowrap;
}
.social-buttons .social-text {
    color: #FFFFFF;
}
5. THêm đoạn mã bên dưới vào trước thẻ </head> :
<script src='http://ajax.googleapis.com/ajax/libs/jquery/1.8.3/jquery.min.js' type='text/javascript'/>
<script src='http://ajax.googleapis.com/ajax/libs/jqueryui/1.9.2/jquery-ui.min.js' type='text/javascript'/>
<script>
    $(window).load(function(){
        $(&#39;.social-buttons .social-icon&#39;).mouseenter(function(){
            $(this).stop();
            $(this).animate({width:&#39;160&#39;}, 500, &#39;easeOutBounce&#39;,function(){}); 
        });
        $(&#39;.social-buttons .social-icon&#39;).mouseleave(function(){
            $(this).stop();
            $(this).animate({width:&#39;43&#39;}, 500, &#39;easeOutBounce&#39;,function(){});
        });
    });
</script>
- Nếu blog của bạn đã có thư viện jquery rồi thì hãy xóa file màu xanh đi.
6. THêm mã bên dưới vào trước thẻ đóng </body> :

<div class='social-buttons button-right hidden-phone hidden-tablet'>
<a class='itemsocial' href='https://www.facebook.com/your FB' id='facebook-btn' target='_blank'><span class='social-icon'><span class='social-text'>Follow via Facebook</span></span></a>
<a class='itemsocial' href='https://twitter.com/your twitter' id='twitter-btn' target='_blank'><span class='social-icon'><span class='social-text'>Follow via Twitter</span></span></a>
<a class='itemsocial' href='https://plus.google.com/your G+' id='google-btn' target='_blank'><span class='social-icon'><span class='social-text'>Follow via Google</span></span></a>
<a class='itemsocial' href='http://pinterest.com/your ID' id='pinterest-btn' target='_blank'><span class='social-icon'>
<span class='social-text'>Follow via Pinterest</span></span></a>
<a class='itemsocial' href='https://www.youtube.com/user/your ID' id='youtube-btn' target='_blank'><span class='social-icon'><span class='social-text'>Follow via Youtube</span></span></a>
<a class='itemsocial' href='http://feeds.feedburner.com/your feed' id='rss-btn' target='_blank'><span class='social-icon'><span class='social-text'>Follow via RSS</span></span></a>
</div>
- Thay các phàn màu xanh thành các id của bạn tương ứng.
7. Lưu lại là oke.

Arrow Key Navigation for Blogger


DETAIL Arrow Key Navigation for Blogger
Navigating through a website using the keyboard arrow keys is really useful as you don't have to look around the page for the Newer or Older page links. You might have already seen this feature on many top blogs.It’s really easy to implement this feature on your Blogger Blog.You just have to add the arrow key navigation widget to your blogger blog.
This is a really simple and clean widget and you can see a demo of this widget right on this page. If you use theRight and Left arrow keys, you will be able to navigate to different pages on this blog. This works not just on the post pages, but also on the blog’s home page and label pages.The Arrow Key Navigation Widget will be disabled when you are typing something into a text box on the blog(This was done to avoid the page from being changed when the user is typing something into a text box and uses the arrow keys to move around this text.).

Why should I add this widget

This is a simple light weight widget which doesn’t depend on any external libraries and it’s really easy to install as well. It will give users a better experience when they are navigating across different pages of your blog.They won't have to scroll all the way down to the bottom of the page and look for the Older and Newer page links.

How to add this Widget

You can add this widget by using the below one click installer.
Add the widget to your sidebar or footer and the Arrow Key Navigation will be activated on your Blog.The Widget title won’t appear on your Blog. So you can give it any appropriate name which will help you in identifying the widget on the layout page.

How to let readers know of this Widget

You might want to add some text to your blog which suggests that your Blog can be traversed using the keyboard arrow keys.Something message similar to “Use the Left or Right Arrow keys to navigate through this blog” might help.

How to Remove the Widget

If you want to remove this widget at any time, you can do that by removing the Arrow Page Navigation Widget from the Layout page.

How this works

If you are curious about how this works, then below is the actual code behind the widget. The code listens for Keyboard inputs and if detects an Arrow Key event, it will redirect the user to the newer or older page. The code picks the newer and older page links from the Blogger’s Page Navigation Links.
<script type='text/javascript'>
document.onkeyup = function(event)
{
if (document.activeElement.nodeName == 'TEXTAREA' || document.activeElement.nodeName == 'INPUT') return;
event = event || window.event;
switch(event.keyCode)
{
case 37:
var newerLink = document.getElementById('Blog1_blog-pager-newer-link');
if(newerLink !=null) window.location.href = newerLink.href;
break;
case 39:
var olderLink = document.getElementById('Blog1_blog-pager-older-link');
if(olderLink!=null) window.location.href = olderLink.href;
}
};
</script>
Please share your thoughts queries or suggestions :-) and if you need further help do let us know.
Source: http://www.bloggerplugins.org/2013/05/arrow-key-navigation-widget-for-blogger.html#more

Jquery Slider Tin Tức - News Slider


DETAIL Nói về jquery thì mình cũng chả rành lắm, đến từ jquery viết còn hay nhầm thì các bạn chắc cũng đoán được. Phần slider rip của gostep.info, các bạn có thể vào đó xem.

Xem DEMO

các bạn xem hình bên dưới.


CSS bên dưới ( mọi người tự căn chỉnh nhé !) và đặt nó trên thẻ </head>

<style>
ul#ticker {
font: "Helvetica,Arial";
height: 26px;
overflow: hidden;
text-align: right;
color: red;
font-size: 12px;
line-height: 28px;
background: #444;
}
ul#ticker strong,ul#ticker strong a {
color: green;
font-size: 10px;
padding-right: 5px;
text-transform: uppercase;
}
#ticker a {
text-decoration: none;
}
ul#ticker a {
color: white;
text-decoration: none;
}
ul, li {
list-style: none outside none;
}
ul#ticker .meta-comments a,.meta-sep,.meta-date{
color: #777777;
}
</style>

Bạn đạt Javascript nơi bạn muốn hiển thị:

<script src="http://ajax.googleapis.com/ajax/libs/jquery/1.4.2/jquery.min.js"></script>
<script src="http://anhnc.googlecode.com/svn/trunk/p/news.js"></script>
<script src="/feeds/posts/default?max-results=12&amp;orderby=published&amp;alt=json-in-script&amp;callback=news"></script>

Phần numberposts (12) có thể unlimit nhé ;))
Chúc các bạn thành công !
Theo fan dung
Nguồn: http://tpm1512.blogspot.com.au/2012/02/jquery-slider-tin-tuc-news-slider.html

Login cùng lúc nhiều tài khoản Google với Chrome 16


DETAIL AnhDaiDienBaiDang Google Chrome 16 with multi user support

Được bổ sung tính năng Add new user, Google Chrome 16 Beta cho phép bạn khai thác cùng lúc nhiều profile khác nhau, hay sử dụng mỗi tài khoản Google trên một cửa sổ riêng. Cụ thể, trên mỗi cửa sổ mới được mở bằng tính năng Add new user, bạn có thể đăng nhập các dịch vụ Google
bằng một tài khoản riêng, tùy chỉnh trình duyệt theo cách riêng, cài đặt và khai thác các ứng dụng web, extension, theme hoàn toànkhác với cửa sổ mặc định...
Mỗi cửa sổ với profile mới sẽ được gán với một tên và biểu tượng riêng để bạn dễ dàng nhận biết. Đặc biệt, những thông tin mà bạn cấu hình cho profile nào đều được lưu giữ lại ngay cả khi đóng cửa sổ tương ứng. Tính năng này s rất thích vì có nhiều tài khoản Google mà cứ phải log out ra vô hay đổi trình duyệt khác thì khá là mất công. Để bắt đầu thử, bạn chọn hình chiếc khóa bên phải > Options > Personal Stuff (panel bên trái) > Add new user
Một cửa sổ mới xuất hiện, bạn đăng nhập một tài khoản Google khác. Vậy là từ nay ban có thể sử dụng cùng lúc nhiều tài khoản rồi nhé. Để kích hoạt bạn chỉ cần chỉ vào cái Icon xinh xinh bên góc trái và chọn tài khoản mình muốn.
Quá tuyệt, lại một G+ nữa cho Chrome. Ngoài ra bạn có thể đổi tên hoặc thay Icon khác cho mỗi tài khoản bằng cách vào lại Options > Personal Stuff > Chọn tài khoản > Edithoặc double click vào tài khoản đó.

Cùng thử nhé...

Nguồn:http://www.blogit.info/2011/11/login-cung-luc-nhieu-tai-khoan-google.html

Thanks for checking out my blog, I hope you find this useful. Click: TQTT- GGM- NEWS- Site Map- HTML Compressor. Comment. Blogger

Auto Scroll Stop Scroll